

Table of Contents
How Does It Work?
- Overall Strategy
- Recommended Monsters
- Floor by Floor Walkthrough
6. The Other Murasame Dungeons
- Fire Murasame
- Water Murasame
- Wood Murasame
7. Frequently Asked Questions
- Recommended Monsters
- Floor by Floor Walkthrough
6. The Other Murasame Dungeons
- Fire Murasame
- Water Murasame
- Wood Murasame
7. Frequently Asked Questions
How Does It Work?
It is kind of confusing at first but once you actually participate in the event, it is pretty straightforward.
First, there will be a regular scheduled Extreme quest that will be up just like any other Extreme quest in the game. This dungeon is called "The Sentient, Iridescent Blade" or most people just call it the Dark Murasame dungeon. The rewards will either drop Dark Murasame, Vouchers, and other drops like Turtles or Stoans/Sharls.
Vouchers come in four varieties, each representing the other elements besides Dark. They are vouchers that lets you enter another Extreme dungeon which you can get the four other elements of Murasame (Fire, Water, Wood, Light). Only Light's dungeon will be at Insidious difficulty where there is No Continue but you will get a drop if you beat it (unlike Impossible dungeons).
The end goal of the event is to ascend Light Murasame. Her materials required for ascension are as follows:
1. Dark Murasame (Luck 10) - Luck 8 from Evo
2. Fire Murasame (Luck 2) - Luck 2 from Evo
3. Water Murasame (Luck 2) - Luck 2 from Evo
4. Wood Murasame (Luck 2) - Luck 2 from Evo
5. Divine Sharls (2) - 1 from Evo
Basically, you farm the Dark Murasame dungeon which will drop the Dark Murasame portion of the needed ascension as well as the vouchers needed for the other 4 elements.
The biggest question here is the actual drop rates of the dungeons. I don't know the actual rates but it is definitely not high, especially for the vouchers. You will always get a Dark Murasame drop from no continue bonus in her dungeon. The other rewards (Clear, Speed, Luck) will drop vouchers, Dark Murasame and other drops. From personal experience, the drop ratio is either 6:3:1 or 5:4:1 (Other:Dark:Vouchers) and the voucher ratio is around 3:3:3:1 (Fire:Water:Wood:Light). Vouchers will not drop on Savage difficulty and the above ratios are for Extreme.
In terms of the voucher dungeons, they are just like regular Extreme dungeons where if you no continue, you get a 100% drop and the rest of the bonuses can drop the respective Murasame or other things. You will never get a different element Murasame to drop from any of the five dungeons. You will also not get voucher dungeons from other voucher dungeons. Light Murasame will be No Continue only but she will have a 100% drop rate if you defeat her.
When I played this in JP, I got at least one Light voucher within the event timeframe. Of course sometimes I get it sooner or later. I usually ran with 4 max luck every time. In terms of actual time that Dark Murasame is up, it is at least 10 hours total (not consecutive). I usually farm for full until I get a Light voucher.
Since there is a lot of RNG involved in terms of drop rates, some people might get all the vouchers relatively quickly while others will struggle to get that elusive Light voucher. There have been reports of people max lucking Dark Murasame before even getting a Light voucher, let alone clearing the dungeon. Best solution is to run with at least 3 max luck monsters to get as much loot as you can get.

Class: Sprite
Hit: BounceType: Balance
Ability: Dark Resistance
Gauge; Null Gravity Barrier
Max HP: 18222 (+4200) - 22422
Max ATK: 18628 (+6375) - 25003 (30003)
Max SPD: 258.27 (+91.80) - 350.07
SS (21 turns): AOE Blast SS (same as Odin, Harley X, Kii SS)
Bump: All Attribute Homing 25 (3294)
Sub: Cross Laser S (2706)
She is a very good all rounder. There aren't many weaknesses to her besides taking her to dungeons she isn't for (ex. DW, warps, mine, etc). She has high stats, a null ability, strong SS and a mob clearing bump combo. You will also feel safer bringing her to Dark dungeons over other Light monsters due to her Dark Resistance ability where she takes 25% less damage from Dark attacks.
In terms of uses, she can be taken to any dungeon that is heavy on Gravity Barriers. She is one of your go-to monsters if you don't have any other top picks for that specific dungeon. For dungeons she is specialized in, she is a top tier pick for Tsukuyomi, an upcoming Impossible dungeon. There are other Extreme dungeons like Visceron, Deathscoil, Dark Wyrm, and Krishna where she is very useful. For future content, she is super helpful in Ghost, Taki Yashahime, and Muramasa.
Gimmicks: Gravity Barrier, Damage Wall, Warp, Mine, Shield, Revive, Poison, Scorpion, Movement
- Stack NGB monsters, not many Light monsters
- Have high HP or monsters with Detox ableberries, you take a lot of poison damage
- Focus on mobs before the boss
Hatcher
Sirius (Evo): Sprite Slayer L+NGB
Ai Mechamori / Chiyo (Asc): NGB+Dark Slayer
Sanada Yukimura (Asc): NGB / Close Spreadshot
Aura Monstriker (Evo); NGB / Command SS / Homing 18
Mundus (Asc): NGB / Delay SS / Homing Destruction 10
Farmable
Surtr (Evo): Sprite Slayer L+NGB / Giga Blast
Izanami (Evo): NGB+NW / Meteor SS / Rebound Laser L4
Jack (Evo): NGB+NW
Queen Butterflight (Evo/Asc); NGB
Deathscoil (Evo/Asc): NGB / Giga Blast
Floor 1

Zombies revive one mob every turn. Clear multiple mobs in one shot while working your way up to the zombie. Once the zombie is cleared, you can stall or move onto the next floor.
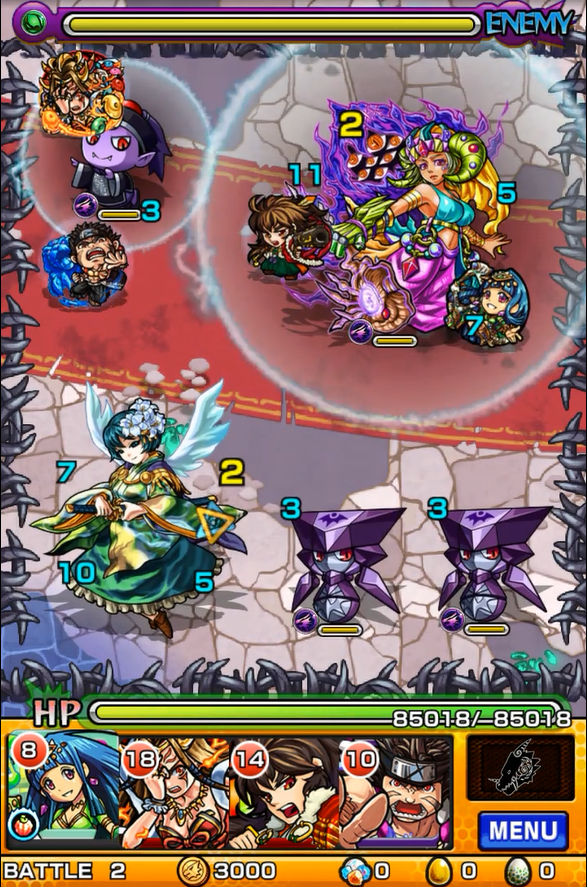
Floor 2

There will be a random Murasame on the top right and a random event boss on the bottom left. Clear the snake and warp monster first and then move on to the event boss. Finally defeat the Murasame.
Floor 3
There will be a random Murasame and Event boss on the bottom left and top right of the map. Just like the previous floor, clear the smaller mobs first, then the event boss, and then Murasame.
Floor 4

Murasame HP: 1 million
Top Right: Ex Laser
Bottom Left: Cross Laser
Bottom Right: Meteor
Floor 5

Murasame HP: 1 million
This is the only floor with Damage Walls. Clear at least one of the ninjas before they shoot their walls in 2 turns. Next clear the snake mobs and then work on Murasame.
Floor 6


Murasame HP: 1.4 million
There will be buffaloes moving in after your first shot. Clear them as fast as you can once they appear. Next work on the mini boss and then Murasame. When you clear the floor, make sure your monsters are on the right side of the map.
Floor 7

Murasame HP: 2.7 million
This is where you will use your strike shots. If you have most or all of your monsters on the right side, then you can ignore the scorpions. Depending on the strike shot, deal damage to the top and bottom mobs and Murasame at the same time.

Gimmicks: Gravity Barrier, Damage Wall, Shield, Warp, Mine, Poison, Revive, Movement
- Focus the mobs over boss in the mini boss stages but boss over mobs in the main boss stages
- Have high HP to tank unavoidable attacks and/or balance your team's elements
- Position well for a safe and stable clear. Also stalling is critical!
Sirius (Evo): Sprite Slayer L+NGB
Saigo Takamori (Asc): NGB+Light Slayer / Wall Bouncing SS
Mundus (Asc): NGB / Delay SS / Homing Destruction 10
Farmable
Surtr (Evo): Sprite Slayer L+NGB / Giga Blast
Izanami (Evo): NGB+NW / Meteor SS / Rebound Laser L4
Kushinada (Evo): MS+NDW / Command SS / Plasma bump
Floor 1

Fire Murasame HP: 1.2 million
This floor has damage walls. Make sure you not hit them since they do over 10k per hit. Focus on the mobs and then destroy Murasame. She will move downwards within 3 turns and back to her original position 5 turns later. Position your monsters to the bottom of the map for the next floor.
Floor 2


Water Murasame HP: 1.9 million
Warps are the focus on this floor. They will shoot in a line in the middle of the map. Clear the mobs and then work on Murasame. She will move to the top left corner within 3 turns and back to her original position 5 turns later. You can leave the warp monster to stall for turns.
Floor 3

Wood Murasame HP: 1.8 million
Make sure you take care of the cobras first since you don't want to take unnecessary poison damage. Mines will appear in an L shape on the bottom right corner of the map. Murasame will move to the bottom right corner within 3 turns and back to her original position 5 turns later.
Floor 4

Dark Murasame HP: 1.8 million
Like the previous floor, kill the cobras first before working on the other enemies. Murasame will move to the middle of the map within 3 turns and back to her original position 5 turns later.
Floor 5

Light Murasame HP: 1.8 million
Clear mobs first. You can bounce between each set to quickly dispatch them (you can't pinch them). Mines will appear in a circle around where Murasame will move. She will move to the left side within 3 turns and back to her original position 5 turns later. Make sure you position all your monsters to the top side of the map. If it is the top left side, it will make your life a lot easier.
Floor 6


Light Murasame HP: 1.5 million
Top Right: Lightning Meteor
Top: All Att. Homing
Bottom Left: Shockwave
Bottom Right: OHKO
Shields will shoot out in a line in the middle of the map. If you don't have your monsters on the top of the map, it will be extremely hard for you to move on. Clear Light Murasame before 5 turns because the Homing attack will deal 30k and it is unavoidable. You can stall for SS after defeating Murasame or position for the next bar where she will appear on the bottom left.
Floor 7


Light Murasame HP: 2 million
There are shields within Uranus that will position themselves around Murasame in 3 turns. Just focus on Murasame and deal with Uranus later. On the next floor, she will appear in the top middle of the map.
Floor 8

Light Murasame HP: 3.7 million
Just like the first boss stage, the shields will shoot in a line in the middle. You can get a pinch between Murasame and the shields to deal damage to all of them. You can also use a meteor SS to clear them in one swoop. Focus all your power onto Murasame.
The other 3 dungeons are relatively easy if you bring the right monsters. You also don't have to bring max luck monsters since they are not useful outside of materials. As long as you deal with the gimmicks (which I will list) then it will be fine!

Gimmicks: Damage Wall, Drone, Gravity Barrier, Mine, Poison, Conveyors
Overall Strategy
- Stack NDW monsters, balance Fire and Water monsters
- Avoid the boss' Cross Laser (bottom CD)
Hatcher Monsters
Beethoven (Evo): NGB+NDW
Verdandi (Asc): NDW+NGB
Sherry Blawesome (Evo): Flight+NDW / Homing Destruction 8
Micha (Asc): NDW
Uesugi Kenshin (Asc): NDW+Water Slayer / Delay SSFarmable Monsters
Izanagi (Evo): All Resist+NDW+Sprite Slayer
Hydra (Evo): NDW
Dracula (Evo): NDW
Water Murasame

Gimmicks: Gravity Barrier, Warp, Damage Wall, Revive
Overall Strategy
- Stack NGB monsters, bonus if they have NW
- Have more Water monsters than Wood monters
Hatcher Monsters
Verdandi (Asc): NDW+NGB
Didier Simflaille (Evo): NGB+NW
Margarite (Evo/Asc): NGB / Show weak spot SS / OWL XL bump
Sirius (Evo): Sprite Slayer L+NGB
Odin (Asc): NGB / AOE Blast SS
Farmable Monsters
Oruga (Asc): NGB+Recovery S / Volatile Blast M bump
Jack (Evo): NGB+NW
Queen Butterflight (Evo/Asc): NGB
Serket (Evo/Asc): NGB
Wood Murasame

Gimmicks: Damage Wall, Mine, Revive, Poison
Overall Strategy
- Stack NDW monsters, but have one or more MS monsters
- Have more Wood monsters than Fire monsters
Hatcher Monsters
Tini (Asc): Flight+NDW / Homing Piercer 8
Yggdrasil (Evo): MS+NDW / Meteor SS
Belphegor (Evo): NDW / One Way Laser XL
Deneb (Evo/Asc): NDW / Rebound Laser L4
Sherry Blawesome (Evo): Flight+NDW / Homing Destruction 8
Farmable Monsters
Kushinada (Evo): MS+NDW / Command SS / Plasma bump
Giga Mantis (Evo): NDW / Meteor SS
Izanagi (Evo): All Resist+NDW+Sprite Slayer
Bastet (Evo): NDW+Sprite Slayer
I don't have max 50 stamina. What should I do if I want to challenge this quest?
First you have to rank up. You can do it on Fridays and Mondays when there is half stamina on Normal Dungeons. You will need to be Rank 36 for max stamina of 50. Rank 120 will give you max stamina 102 (rank 119 is max stamina of 99). You can also use an orb to restore above your max stamina but you can't do that if you have full stamina.
Is this event ever coming back?
Yes, it is a reoccurring quest. In JP, they come back once every 2-3 months.
Will vouchers drop in Savage?
No they will not.
Will vouchers expire?
No, they will never expire. You can play them anytime you want as well.
Are the vouchers Co-Op Only?
No they are not.
How to raise luck?
Fuse the SAME monsters together. You cannot fuse one element of Murasame to another element to raise luck.
Will I be not able to ascend Light Murasame if I don't have the materials during the event time frame?
You will still be able to ascend Light Murasame anytime, even after the events are over.
Where do I get Divine Sharls?
You can get divine sharls on daily dungeons (besides Friday). You can get them by mission logs where you have to rank up or beating co-op dungeons. Look out for events where there drop rate are increased!
If I don't have the recommended monsters, should I just give up?
Not really. The monsters I listed are to give strikers an idea of what is stable and safe in terms of beating Murasame and her dungeons. There are a lot of monsters in the game that can beat those dungeons that are not listed.
What are the best max luck monsters?
The best max luck monsters are Surtr and Izanami. I recommend having at least 1 of each in both Dark and Light dungeons, even if they are not max luck. In Dark Murasame, any NGB max luck would be fine as long as you have Surtr and Izanami in your team. I don't recommend QB or Deathscoil in the Light dungeon.
What are the best hatcher monsters?
The one monster that deals with both Dark and Light dungeons is Sirius (Evo). He has a Sprite Slayer L which is a Slayer for Murasame. He is also a NGB monster which are the main gimmicks for them. However, he is not absolutely needed for those dungeons. He can be replaced with a Surtr or Izanami. I do recommend you to bring him if you have him.
Where can I find videos of these quests?
I made a playlist of clearing all 5 quests on my Youtube channel:
https://www.youtube.com/playlist?list=PLc1Lx-jCz_bH3iSGohE1pAmLPG9-JM3kT
There might be monsters you are unfamiliar with so watch for the flow of the dungeon instead of who to actually bring.
No comments:
Post a Comment